검색한 단어와 동일한 단어가 존재할 경우 : 한글->영어, 영어->한글 로 변환

없을 경우 : 재검색 하면서 검색단어와 사전의 단어 앞글자가 일치하는 경우를 출력


실행 환경 : 실행파일과 같은 폴더에 dictionaly.txt 파일이 존재할 것


1
2
3
4
5
6
7
8
9
학교
school
학생
student
사랑
love
반복
loop
-1
cs


▲dictionaly.txt format


1
2
3
4
5
6
7
8
9
10
11
12
13
14
15
16
17
18
19
20
21
22
23
24
25
26
27
28
29
30
31
32
33
34
35
36
37
38
39
40
41
42
43
44
45
46
47
48
49
50
51
52
53
54
55
56
57
58
59
60
61
62
63
64
65
66
67
68
69
70
71
72
73
74
75
76
77
78
79
80
81
#include<iostream>
#include<fstream>
#include<string>
using namespace std;
void main() {
    
    ifstream in("dictionaly.txt");
    string strDictionaly[100][2], seachWord;
    char strTemp[100];
    int t = 0, cnt = 0;
    //사전 불러오기
    while (1)
    {
        in.getline(strTemp, 100);
        if (!strcmp(strTemp, "-1")) break;
        if (!t)
        {
            strDictionaly[cnt][t] = strTemp;
            t = 1;
        }
        else {
            strDictionaly[cnt][t] = strTemp;
            cnt++;
            t = 0;
        }
    }
    int i, j;
    bool isSerach;
    while (1) {
        cout << "검색할 단어를 입력하세요 (종료 : -1)" << endl;
        cin >> strTemp;
        seachWord = strTemp;
        //종료 메시지일 경우 반복문 탈출
        if (seachWord =="-1")
        {
            cout << "사전 프로그램을 종료합니다." << endl;
            break;
        }
        //사전 검색
        isSerach = false;
        for (i = 0; i <= cnt; i++)
        {
            for (j = 0; j < 2; j++) {
                //동일한 단어 찾을 경우 탈출
                if (strDictionaly[i][j] == seachWord)
                {
                    isSerach = true;
                    goto a10;
                }
            }
        }
    a10:;
        //동일 단어 찾을 경우
        if (isSerach)
        {
            //영어->한글 한글->영어 로 배열 인덱스 변환
            j = (j == 0 ? 1 : 0);
            cout << strDictionaly[i][j] << endl;
        }
        else {
            //동일 단어 없을시 앞글자가 동일한 단어 출력
            isSerach = false;
            for (i = 0; i <= cnt; i++)
            {
                for (j = 0; j < 2; j++) {
                    if (strDictionaly[i][j].find(seachWord) == 0)
                    {
                        isSerach = true;
                        cout << strDictionaly[i][j] << " ";
                    }
                }
            }
            //그런 단어도 없을 경우 검색 실패
            if (!isSerach)
            {
                cout << "검색 결과가 없습니다.";
            }
            cout << endl;
        }
    }
}
cs


출력 결과


'프로그래밍 > C++' 카테고리의 다른 글

(MFC) 메시지 처리  (0) 2016.07.09
(C++) 클래스와 객체  (0) 2016.07.09
(C++) 상속을 이용한 간단한 계산 클래스 구현  (0) 2016.07.09
(C++) 상속성  (0) 2016.07.09
(C++) 연산자 오버로딩  (0) 2016.07.09


1
2
3
4
5
6
7
8
9
10
11
12
13
14
15
16
17
18
19
20
21
22
23
24
25
26
27
28
29
30
31
32
33
34
35
36
37
38
39
40
41
42
43
44
45
46
47
48
49
50
51
52
53
54
55
56
57
58
59
60
61
62
63
64
65
66
67
68
69
70
71
72
73
74
75
76
77
78
79
80
81
82
83
84
85
86
87
88
89
90
91
92
93
94
95
96
97
98
99
100
101
102
103
104
105
106
107
108
109
110
#include<iostream>
using namespace std;
 
class Calc {
protected:
    int a, b;
    char c;
public:
    Calc(int new_a, int new_b,char new_c);
    void Prn();
};
void Calc::Prn() {
    cout << "a : "<< a << "\tb : " << b<<"\tc : " << c << endl;
}
Calc::Calc(int new_a, int new_b, char new_c) : a(new_a), b(new_b), c(new_c)
{
}
 
class Add : public Calc {
protected:
    int c;
public:
    Add(int new_a, int new_b);
    void Sum();
    void Prn();
};
void Add::Sum() {
    c = a + b;
}
Add::Add(int new_a, int new_b) : Calc(new_a, new_b,'+') ,c(0)
{
}
void Add::Prn() {
    cout << a << " + " << b << " = " << c << endl;
}
 
class Sub : public Calc {
protected:
    int c;
public:
    Sub(int new_a, int new_b);
    void Sum();
    void Prn();
};
void Sub::Sum() {
    c = a - b;
}
Sub::Sub(int new_a, int new_b) : Calc(new_a, new_b, '-'), c(0)
{
}
void Sub::Prn() {
    cout << a << " - " << b << " = " << c << endl;
}
 
class Mul : public Calc {
protected:
    int c;
public:
    Mul(int new_a, int new_b);
    void Sum();
    void Prn();
};
void Mul::Sum() {
    c = a * b;
}
Mul::Mul(int new_a, int new_b) : Calc(new_a, new_b, '*'), c(0)
{
}
void Mul::Prn() {
    cout << a << " * " << b << " = " << c << endl;
}
 
class Div : public Calc {
protected:
    double c;
public:
    Div(int new_a, int new_b);
    void Sum();
    void Prn();
};
void Div::Sum() {
    c = (double)a / b;
}
Div::Div(int new_a, int new_b) : Calc(new_a, new_b, '/'), c(0)
{
}
void Div::Prn() {
    cout << a << " / " << b << " = " << c << endl;
}
 
void main() {
    Calc x(35'-');
    x.Prn();
 
    Add y(35);
    y.Sum();
    y.Prn();
 
    Sub z(35);
    z.Sum();
    z.Prn();
 
    Mul a(35);
    a.Sum();
    a.Prn();
 
    Div b(35);
    b.Sum();
    b.Prn();
}
cs


'프로그래밍 > C++' 카테고리의 다른 글

(C++) 클래스와 객체  (0) 2016.07.09
(C++) Simple 한/영사전 예제  (0) 2016.07.09
(C++) 상속성  (0) 2016.07.09
(C++) 연산자 오버로딩  (0) 2016.07.09
(C++) 클래스 객체  (0) 2016.07.09

상속

부모 클래스를 물려받아 자식클래스가 그대로 사용할 수 있는 것

이미 정의된 클래스를 상속받아 사용 할 수 있는 장점

부모가 되는 클래스 : 기반 클래스, 기초 클래스, 베이스 클래스

자식 클래스 : 파생 클래스


 접근 지정자

자신의 클래스

파생 클래스

클래스 외부

 private

O

X

X

protected

O

O

X

 public

O

O

O


파생 클래스 사용 방법


class 파생 클래스 : 접근 지정자 기반 클래스{

    멤버변수:

    멤버함수:

};


1
2
3
4
5
6
7
8
9
10
11
12
13
14
15
16
17
18
19
20
21
22
23
24
25
26
27
28
29
30
31
32
33
34
35
36
37
38
39
40
41
42
43
44
45
46
47
48
49
#include<iostream>
 
using namespace std;
 
class Calc {
protected:
    int a, b, c;
public:
    void Init(int new_a, int new_b);
    void Prn();
};
void Calc::Init(int new_a, int new_b) {
    a = new_a;
    b = new_b;
    c = 0;
}
void Calc::Prn() {
    cout << "a : "<< a << "\tb : " << b << "\tc : " << c << endl;
}
 
 
class Add : public Calc {
public:
    void Sum();
};
void Add::Sum() {
    c = a + b;
}
 
 
class Mul : public Calc {
public:
    void Gob();
};
void Mul::Gob() {
    c = a*b;
}
 
 
void main() {
    Add x;
    Mul y;
    x.Init(35);
    y.Init(27);
    x.Sum();
    x.Prn();
    y.Gob();
    y.Prn();
}
cs


▲부모 클래스와 파생 클래스 생성 예제


상속관계에서의 생성자와 소멸자

생성자와 소멸자는 맴버함수지만 상속이 불가능

파생 객체가 생성시 부모 클래스의 생성자 까지 연속적으로 자동 호출됨

즉, 위 예제의 Add 클래스를 생성할때 Calc 생성자도 호출되며 메모리 공간엔 Calc+Add 만큼 공간을 차지하게 됨


1
2
3
4
5
6
7
8
9
10
11
12
13
14
15
16
17
18
19
20
21
22
23
24
25
26
27
28
29
30
31
#include<iostream>
 
using namespace std;
 
class Base {
public:
    Base();
    ~Base();
};
 
Base::Base() {
    cout << "부모 클래스의 생성자 호출" << endl;
}
Base::~Base() {
    cout << "부모 클래스의 소멸자 호출" << endl;
}
 
class Dervied : public Base{
public:
    Dervied();
    ~Dervied();
};
Dervied::Dervied() {
    cout << "파생 클래스의 생성자 호출" << endl;
}
Dervied::~Dervied() {
    cout << "파생 클래스의 생성자 호출" << endl;
}
void main() {
    Dervied obj;
}
cs

▲상속관계에서의 생성자와 소멸자


부모 클래스의 생성자가 인자값이 필요한 경우 다음과 같이 전달할 수 있다.


1
2
3
4
5
6
7
8
9
10
11
12
13
14
15
16
17
18
19
20
21
22
23
24
25
26
27
28
29
30
31
32
33
34
35
36
37
38
39
40
41
42
43
44
45
46
#include<iostream>
 
using namespace std;
 
class Calc {
protected:
    int a, b, c;
public:
    Calc();
    Calc(int new_a, int new_b);
    void Prn();
};
void Calc::Prn() {
    cout << "a : "<< a << "\tb : " << b << "\tc : " << c << endl;
}
Calc::Calc() {
    a = 0; b = 0; c = 0;
}
Calc::Calc(int new_a, int new_b) : a(new_a), b(new_b), c(0)
{
}
 
class Add : public Calc {
public:
    void Sum();
    Add(int new_a, int new_b);
    Add();
};
void Add::Sum() {
    c = a + b;
}
Add::Add(int new_a, int new_b) : Calc(new_a, new_b) 
{
}
Add::Add() : Calc() {
 
}
 
void main() {
    Calc x(35);
    x.Prn();
    Add y(35);
    y.Prn();
    Add z;
    z.Prn();
}
cs


▲상속 관계에서 생성자 문제 해결하기


오버라이딩

이미 정의된 함수를 파생클래스에서 다시 정의하는 것(재정의)

부모 클래스에서 정의된 함수의 원형과 동일한 형태여야 함


오버로딩 : 같은 함수이름을 매개변수와 반환타입을 다르게하여 여러개 정의하는 것

오버라이딩 : 상속받은 함수를 재정의 하는 것


1
2
3
4
5
6
7
8
9
10
11
12
13
14
15
16
17
18
19
20
21
22
23
24
25
26
27
28
29
30
31
32
33
34
35
36
37
38
39
40
41
42
43
44
45
46
47
48
49
50
51
52
53
54
55
56
57
58
59
60
61
62
63
64
65
66
67
68
69
70
71
72
73
74
75
76
#include<iostream>
 
using namespace std;
 
class Calc {
protected:
    int a, b;
public:
    Calc();
    Calc(int new_a, int new_b);
    void Prn();
};
void Calc::Prn() {
    cout << "a : "<< a << "\tb : " << b << endl;
}
Calc::Calc() : a(0),b(0)
{
}
Calc::Calc(int new_a, int new_b) : a(new_a), b(new_b)
{
}
 
class Add : public Calc {
protected:
    int c;
public:
    Add(int new_a, int new_b);
    Add();
    void Sum();
    void Prn();
};
void Add::Sum() {
    c = a + b;
}
Add::Add(int new_a, int new_b) : Calc(new_a, new_b) ,c(0)
{
}
Add::Add() : Calc(), c(0) {
 
}
void Add::Prn() {
    cout << a << " + " << b << " = " << c << endl;
}
 
class Mul : public Calc {
protected:
    int c;
public:
    Mul(int new_a, int new_b);
    Mul();
    void Gob();
    void Prn();
};
void Mul::Gob() {
    c = a * b;
}
Mul::Mul(int new_a, int new_b) : Calc(new_a, new_b), c(0)
{
}
Mul::Mul() : Calc(), c(0) {
 
}
void Mul::Prn() {
    cout << a << " * " << b << " = " << c << endl;
}
 
void main() {
    Calc x(35);
    x.Prn();
    Add y(35);
    y.Sum();
    y.Prn();
    Mul z(35);
    z.Gob();
    z.Prn();
}
cs


▲오버라이딩 예제


객체를 다루기 위한 함수

1
2
3
4
5
6
7
8
9
10
11
12
13
14
15
16
17
18
19
20
21
22
23
24
25
26
27
28
29
30
31
32
33
34
35
36
37
38
#include<iostream>
using namespace std;
 
class Complex {
private:
    int real;
    int image;
public:
    Complex(int r = 0int i = 0);
    void showComplex();
    Complex sum(Complex rightHand);
};
 
void Complex::showComplex() {
    cout << "( " << real << " + " << image << "i )" << endl;
}
 
Complex::Complex(int r, int i) {
    real = r;
    image = i;
}
 
Complex Complex::sum(Complex rightHand) {
    Complex res;
    res.real = this->real + rightHand.real;
    res.image = this->image + rightHand.image;
    return res;
}
 
 
void main() {
    Complex x(1020), y(2040);
    Complex z;
    z = x.sum(y);
    x.showComplex();
    y.showComplex();
    z.showComplex();
}
cs


▲두 객체의 합을 클래스로 반환하는 메소드를 사용한 예


1
2
3
4
5
6
7
8
9
10
11
12
13
14
15
16
17
18
19
20
21
22
23
24
25
26
27
28
29
30
31
32
33
34
35
36
37
38
#include<iostream>
using namespace std;
 
class Complex {
private:
    int real;
    int image;
public:
    Complex(int r = 0int i = 0);
    void showComplex();
    friend Complex sum(Complex leftHand, Complex rightHand);
};
 
void Complex::showComplex() {
    cout << "( " << real << " + " << image << "i )" << endl;
}
 
Complex::Complex(int r, int i) {
    real = r;
    image = i;
}
 
Complex sum(Complex leftHand, Complex rightHand) {
    Complex res;
    res.real = leftHand.real + rightHand.real;
    res.image = leftHand.image + rightHand.image;
    return res;
}
 
 
void main() {
    Complex x(1020), y(2040);
    Complex z;
    z = sum(x, y);
    x.showComplex();
    y.showComplex();
    z.showComplex();
}
cs


▲프렌드 함수로 두 객체의 합을 구하는 메소드 예


friend : 클래스에 private된 멤버변수를 외부함수에서 사용할 수 있도록 하는 키워드

데이터 보안에 문제가 있으므로 남발하면 안됨


클래스에서 선행처리, 후행처리 하는 방법

real의 값을 1 더하는 행동

++this->real -> 선행처리

this->real++ -> 후행처리

복사된 값을 넘겨주느냐 더한값을 넘겨주느냐에 따라 선행과 후행이 결정됨


1
2
3
4
5
6
7
8
9
10
11
12
13
14
15
16
17
18
19
20
21
22
23
24
25
26
27
28
29
30
31
32
33
34
35
36
37
38
39
40
41
42
43
44
45
46
47
48
49
#include<iostream>
using namespace std;
 
class Complex {
private:
    int real;
    int image;
public:
    Complex(int r = 0int i = 0);
    void showComplex();
    Complex addOnePreFix();
    Complex addOnePostFix();
};
 
void Complex::showComplex() {
    cout << "( " << real << " + " << image << "i )" << endl;
}
 
Complex::Complex(int r, int i) {
    real = r;
    image = i;
}
//선행처리
Complex Complex::addOnePreFix() {
    ++this->real;
    ++this->image;
    return *this;
}
//후행처리
Complex Complex::addOnePostFix() {
    Complex temp;
    temp = *this;
    ++this->real;
    ++this->image;
    return temp;
}
void main() {
    Complex x(1020), y(2040);
    Complex z;
    cout << "---- 선행처리 ----"<<endl;
    z = x.addOnePreFix();
    x.showComplex();
    z.showComplex();
 
    cout << "---- 후행처리 ----" << endl;
    z = y.addOnePreFix();
    y.showComplex();
    z.showComplex();
}
cs


출력결과


프렌드 함수를 이용한 구현


1
2
3
4
5
6
7
8
9
10
11
12
13
14
15
16
17
18
19
20
21
22
23
24
25
26
27
28
29
30
31
32
33
34
35
36
37
38
39
40
41
42
43
44
45
46
47
48
49
#include<iostream>
using namespace std;
 
class Complex {
private:
    int real;
    int image;
public:
    Complex(int r = 0int i = 0);
    void showComplex();
    friend Complex &addOnePreFix(Complex &Operand);
    friend Complex addOnePostFix(Complex &Operand);
};
 
void Complex::showComplex() {
    cout << "( " << real << " + " << image << "i )" << endl;
}
 
Complex::Complex(int r, int i) {
    real = r;
    image = i;
}
//선행처리
Complex &addOnePreFix(Complex &Operand) {
    ++Operand.real;
    ++Operand.image;
    return Operand;
}
//후행처리
Complex addOnePostFix(Complex &Operand) {
    Complex temp;
    temp = Operand;
    ++Operand.real;
    ++Operand.image;
    return temp;
}
void main() {
    Complex x(1020), y(2040);
    Complex z;
    cout << "---- 선행처리 ----" << endl;
    z = addOnePreFix(x);
    x.showComplex();
    z.showComplex();
 
    cout << "---- 후행처리 ----" << endl;
    z = addOnePostFix(y);
    y.showComplex();
    z.showComplex();
}
cs


연산자 오버로딩


C++에서 기본 자료형으로 사용하고 있는 연산자를 재정의 하는 것

연산자도 함수로 취급하기 때문에 함수를 정의하는 방법과 동일 한 방법으로 연산자를 오버로딩할 수 있음

오버로딩 된 연산자를 연산자함수(Operator Function)이라고 함

연산에 참여하는 피연산자는 연산자를 정의할 때 매개변수로 구현하여 사용

매개변수 자료형에 의해 그 연산자를 사용할 수 있는 자료형이 결정됨


반환값 operator연산자(매개변수1,매개변수2,...)

{

함수의 본체

}


1
2
3
4
5
6
7
8
9
10
11
12
13
14
15
16
17
18
19
20
21
22
23
24
25
26
27
28
29
30
31
32
33
34
35
36
37
38
39
40
41
42
43
44
45
46
47
48
49
50
51
52
53
54
55
56
57
58
59
60
61
62
63
64
65
66
67
68
69
70
71
#include<iostream>
using namespace std;
 
class Complex {
private:
    int real;
    int image;
public:
    Complex(int r = 0int i = 0);
    void showComplex();
    Complex operator+(Complex rightHand);
    Complex operator-(const Complex &rightHand) const;
    Complex operator-() const;
};
 
void Complex::showComplex() {
    if (image > 0)
        cout << "(" << real << "+" << image << " i)" << endl;
    else if (image < 0)
        cout << "(" << real << image << " i)" << endl;
    else
        cout << real << endl;
}
 
Complex::Complex(int r, int i) {
    real = r;
    image = i;
}
 
//연산자 +를 오버로딩
Complex Complex::operator+(Complex rightHand) {
    Complex res;
    res.real = this->real + rightHand.real;
    res.image = this->image + rightHand.image;
    return res;
}
//연산자 -를 오버로딩
Complex Complex::operator-(const Complex &rightHand) const{
    Complex res;
    res.real = this->real - rightHand.real;
    res.image = this->image - rightHand.image;
    return res;
}
//부호 변경
Complex Complex::operator-() const 
{
    Complex res;
    res.real = -real;
    res.image = -image;
    return res;
}
void main() {
    Complex x(1020), y(2040);
    Complex z;
    cout << "---- 두 Complex 객체에 대한 덧셈 ----" << endl;
    z = x + y;
    x.showComplex();
    y.showComplex();
    z.showComplex();
 
    cout << "---- 두 Complex 객체에 대한 뺄셈 ----" << endl;
    z = x - y;
    x.showComplex();
    y.showComplex();
    z.showComplex();
 
    cout << "---- Complex 객체의 부호 변경 ----" << endl;
    z = -x;
    x.showComplex();
    z.showComplex();
}
cs


출력결과


cout에서 출력할 때 사용하는 << 연산자도 연산자오버로딩이 가능함.


1
2
3
4
5
6
7
8
9
10
11
12
13
14
15
16
17
18
19
20
21
22
23
24
#include<iostream>
using namespace std;
 
class Complex {
private:
    int real;
    int image;
public:
    Complex(int r = 0int i = 0);
    friend ostream &operator<<(ostream &os, const Complex &comObj);
};
 
Complex::Complex(int r, int i) {
    real = r;
    image = i;
}
ostream &operator<<(ostream &os, const Complex &comObj) {
    os << "( " << comObj.real << " + " << comObj.image << "i )" << endl;
    return os;
}
void main() {
    Complex x(1020);
    cout << x;
}
cs


출력결과


객체 포인터 변수 선언
클래스명 *객체 포인터 변수;
화살표(->) 연산자 사용가능
1
2
3
4
5
6
7
8
9
10
11
12
13
14
15
16
17
18
19
20
21
22
23
24
25
26
27
28
29
30
31
32
33
34
35
36
37
38
39
#include<iostream>
using namespace std;
 
class Complex
{
private:
    int real;
    int image;
public:
    Complex(int r = 0int i = 0);
    void ShowComplex() const;
};
 
Complex::Complex(int r, int i) : real(r), image(i)
{
}
 
void Complex::ShowComplex() const
{
    cout << "( " << real << " + " << image << "i )" << endl;
}
 
void main() {
    Complex x(1020);
    Complex y;
    cout << " Object x => ";
    x.ShowComplex();
    cout << " Object y => ";
    y.ShowComplex();
 
    Complex *pCom;
    pCom = &x;
    cout << "\n pCom->ShowComplex() => ";
    pCom->ShowComplex();
 
    pCom = &y;
    cout << "pCom->ShowComplex() => ";
    pCom->ShowComplex();
}
cs

▲객체 포인터 사용


내부 포인터 this

객체의 맴버함수를 호출할때 사용할 수 있는 포인터

컴파일러가 맴버변수 앞에 자동적으로 붙여주므로 생략이 가능하지만 매개변수와 이름이 같을 때 구분하기위해 사용할 수 있음


객체 간의 값 치환

클래스는 c의 구조체를 확장한 개념으로 비교는 할 수 없으나 치환은 가능함.


1
2
3
4
5
6
7
8
9
10
11
12
13
14
15
16
17
18
19
20
21
22
23
24
25
26
27
28
29
30
31
32
33
34
35
36
37
38
39
40
41
42
43
44
45
46
47
48
49
50
51
52
53
#include<iostream>
using namespace std;
 
class Complex
{
private:
    int real;
    int image;
public:
    Complex(int r = 0int i = 0);
    void ShowComplex() const;
    void SetComplex(int x = 0int i = 0);
};
 
Complex::Complex(int r, int i) : real(r), image(i)
{
}
 
void Complex::ShowComplex() const
{
    cout << "( " << real << " + " << image << "i )" << endl;
}
 
//내부포인터 this를 이용함
void Complex::SetComplex(int real, int image)
{
    this->real = real;
    this->image = image;
}
 
void main() {
    Complex x(1020);
    Complex y;
    cout << " Object x => ";
    x.ShowComplex();
    cout << " Object y => ";
    y.ShowComplex();
 
    cout << "------------------------------------ \n";
    //객체 단위로 값 치환
    y = x;
    cout << " x => ";
    x.ShowComplex();
    cout << " y => ";
    y.ShowComplex();
 
    cout << "------------------------------------ \n";
    y.SetComplex(3040);
    cout << " x => ";
    x.ShowComplex();
    cout << " y => ";
    y.ShowComplex();
}
cs


▲this와 객체 치환


참조에 의한 호출 방식으로도 값을 치환할 수 있다.


1
2
3
4
5
6
7
8
9
10
11
12
13
14
15
16
17
18
19
20
21
22
23
24
25
26
27
28
29
30
31
32
33
34
35
36
37
38
39
40
41
42
43
44
45
46
47
48
#include<iostream>
using namespace std;
 
class Complex
{
private:
    int real;
    int image;
public:
    Complex(int r = 0int i = 0);
    void ShowComplex() const;
    void SetComplex(int x = 0int i = 0);
};
 
Complex::Complex(int r, int i) : real(r), image(i)
{
}
 
void Complex::ShowComplex() const
{
    cout << "( " << real << " + " << image << "i )" << endl;
}
 
//내부포인터 this를 이용함
void Complex::SetComplex(int real, int image)
{
    this->real = real;
    this->image = image;
}
void CopyComplex(Complex *des, Complex src)
{
    *des = src;
}
void main() {
    Complex x(1020);
    Complex y;
    cout << " Object x => ";
    x.ShowComplex();
    cout << " Object y => ";
    y.ShowComplex();
 
    cout << "------------------------------------ \n";
    CopyComplex(&y, x);
    cout << " x => ";
    x.ShowComplex();
    cout << " y => ";
    y.ShowComplex();
}
cs
▲Call by Reference 치환방식


객체를 주소에 의한 호출을 사용하여 객체가 다른 것을 참조할 수 있도록 할 수 있다.


1
2
3
4
5
6
7
8
9
10
11
12
13
14
15
16
17
18
19
20
21
22
23
24
25
26
27
28
29
30
31
32
33
34
35
36
37
38
39
40
41
42
43
44
45
46
47
#include<iostream>
using namespace std;
 
class Complex
{
private:
    int real;
    int image;
public:
    Complex(int r = 0int i = 0);
    void ShowComplex() const;
    void SetComplex(int x = 0int i = 0);
};
 
Complex::Complex(int r, int i) : real(r), image(i)
{
}
 
void Complex::ShowComplex() const
{
    cout << "( " << real << " + " << image << "i )" << endl;
}
 
//내부포인터 this를 이용함
void Complex::SetComplex(int real, int image)
{
    this->real = real;
    this->image = image;
}
Complex & CopyComplex(Complex &des, const Complex &src)
{
    des = src;
    return des;
}
void main() {
    Complex x(1020);
    Complex y;
    Complex z;
 
    z = CopyComplex(y, x);
    cout << " x => ";
    x.ShowComplex();
    cout << " y => ";
    y.ShowComplex();
    cout << " z => ";
    z.ShowComplex();
}
cs

 ▲모두 x를 참조하는 객체가 되는 예제


정적 멤버변수

특정 클래스의 모든 객체가 공유하는 것(전역변수 원리와 동일)

사용 조건


  • 정적 멤버변수는 특정 클래스 내부에 선언해야 함
  • 정적 멤버변수는 클래스 밖에서 별도로 초기화되어야 함

 정적 멤버함수에서는 this 래퍼런스 사용못함. 인스턴스 변수 사용할 수 없음. 오버라이딩 되지 않음


1
2
3
4
5
6
7
8
9
10
11
12
13
14
15
16
17
18
19
20
21
22
23
24
25
26
27
28
29
30
31
32
33
34
#include<iostream>
using namespace std;
 
class StaticTest {
private:
    static int a;
    int b;
public:
    StaticTest();
    static void SetA(int new_a);
    static int GetA();
};
int StaticTest::a = 10;
 
StaticTest::StaticTest() {
    b = 20;
}
 
void StaticTest::SetA(int new_a) {
    a = new_a;
}
 
int StaticTest::GetA() {
    return a;
}
 
void main() {
    cout << " StaticTest::GetA() => " << StaticTest::GetA() << "\n\n";
 
    StaticTest s1, s2;
    s1.SetA(10000);
    cout << " s1.GetA() -> " << s1.GetA() << "\t";
    cout << " s2.GetA() -> " << s2.GetA() << "\n\n";
}
cs

▲정적 멤버변수,함수 사용 예제


1
2
3
4
5
6
7
8
9
10
11
12
13
14
15
16
17
18
19
20
21
22
23
24
25
26
27
28
29
30
31
32
33
34
35
36
37
38
39
40
41
42
43
44
45
46
47
48
49
50
51
52
#include<iostream>
using namespace std;
 
class CStud {
private:
    char name[30];
    char hphone[20];
    char email[30];
    static int cnt;
public :
    CStud(char *n= "성윤정"char *= "017-777-7777"char*= "pink@daum.net");
    ~CStud();
    void prn();
    static void prn_cnt();
};
int CStud::cnt = 0;
CStud::CStud(char *n, char *h, char *e)
{
    strcpy(name, n);
    strcpy(hphone, h);
    strcpy(email, e);
    cnt++;
}
CStud::~CStud() {
    cnt--;
}
 
void CStud::prn() {
    cout << "이름\t:" << name << endl;
    cout << "핸드폰\t:" << hphone << endl;
    cout << "이메일\t:" << email << endl;
}
 
void CStud::prn_cnt() {
    cout << "\n현재까지 등록된 인원수 : " << cnt << "\n\n";
}
 
void main() {
    CStud::prn_cnt();
 
    CStud man1("전수빈""019-9087-0975""subin@pride.com");
    man1.prn();
    CStud man2("전원지""017-9087-0975""won@pride.com");
    man2.prn();
 
    cout << "\n# 중간에 인원수를 파악합니다.";
    man2.prn_cnt();
    CStud man3;
    man3.prn();
    cout << "\n클래스의 할당된 메모리 사이즈 : " << sizeof(CStud) << endl;
    CStud::prn_cnt();
}
cs

▲정적 멤버변수 사용 이용


객체 배열

선언 : 클래스명 객체배열명[원소의 개수];

참조 객체배열명[인덱스].멤버변수or함수;


1
2
3
4
5
6
7
8
9
10
11
12
13
14
15
16
17
18
19
20
21
22
23
24
25
26
27
28
29
30
31
32
#include<iostream>
using namespace std;
 
class Complex
{
private:
    int real;
    int image;
public:
    Complex(int r = 0int i = 0);
    void ShowComplex() const;
};
 
Complex::Complex(int r, int i) : real(r), image(i)
{
}
 
void Complex::ShowComplex() const
{
    cout << "( " << real << " + " << image << "i )" << endl;
}
 
void main() {
    Complex arr[4= {
        Complex(2,4),
        Complex(4,8),
        Complex(8,16),
        Complex(16,32)
    };
    for (int i = 0; i < 4; i++)
        arr[i].ShowComplex();
}
cs

▲객체 배열 사용 예제


객체 배열과 포인터 

포인터 변수에 객체 배열 인덱스를 줌으로써 사용가능


1
2
3
4
5
6
7
8
9
10
11
12
13
14
15
16
17
18
19
20
21
22
23
24
25
26
27
28
29
30
31
32
33
34
#include<iostream>
using namespace std;
 
class Complex
{
private:
    int real;
    int image;
public:
    Complex(int r = 0int i = 0);
    void ShowComplex() const;
};
 
Complex::Complex(int r, int i) : real(r), image(i)
{
}
 
void Complex::ShowComplex() const
{
    cout << "( " << real << " + " << image << "i )" << endl;
}
 
void main() {
    Complex arr[4= {
        Complex(2,4),
        Complex(4,8),
        Complex(8,16),
        Complex(16,32)
    };
    Complex *pCom = arr;
    pCom->ShowComplex();
    (pCom+1)->ShowComplex();
 
}
cs

▲객체 배열을 포인터로 참조한 예제


프렌드 함수

외부 함수에서 접근하고자 할때 사용

함수 앞에 friend를 붙인다.

데이터를 보안때문에 private를 사용한것이기 때문에 허용여부를 잘 판단해야됨

1
2
3
4
5
6
7
8
9
10
11
12
13
14
15
16
17
18
19
20
21
22
23
24
25
26
27
28
29
30
31
32
33
34
35
36
37
38
39
40
#include<iostream>
using namespace std;
 
class Complex
{
private:
    int real;
    int image;
public:
    Complex(int r = 0int i = 0);
    void ShowComplex() const;
 
    friend void prn(Complex *pCom);
};
 
Complex::Complex(int r, int i) : real(r), image(i)
{
}
 
void Complex::ShowComplex() const
{
    cout << "( " << real << " + " << image << "i )" << endl;
}
 
void prn(Complex *pCom) {
    for (int i = 0; i < 4; i++) {
        cout << "( " << pCom[i].real << " + " << pCom[i].image << "i )" << endl;
    }
}
 
void main() {
    Complex arr[4= {
        Complex(2,4),
        Complex(4,8),
        Complex(8,16),
        Complex(16,32)
    };
    Complex *pCom = arr;
    prn(arr);
}
cs

▲프렌드 함수 예제


개발환경 : MFC

256*256 이미지만 가능

멤버변수에 DCT한 각 픽셀값 저장후 역DCT에 사용

DCT값 출력시 해당 블록의 최대값이 255가 되도록 계산하여 블록에 출력

따로 DCT계산값을 건들이진 않음


'프로그래밍 > C++' 카테고리의 다른 글

(C++) Simple 한/영사전 예제  (0) 2016.07.09
(C++) 상속을 이용한 간단한 계산 클래스 구현  (0) 2016.07.09
(C++) 상속성  (0) 2016.07.09
(C++) 연산자 오버로딩  (0) 2016.07.09
(C++) 클래스 객체  (0) 2016.07.09

네트워크 프로그래밍

소켓이라는 것을 기반으로 프로그래밍을 하기 때문에 소켓 프로그래밍이라고도 함.

네트워크로 연결된 둘 이상의 컴퓨터 사이에서의 데이터 송수신 프로그램의 작성을 의미함.


소켓에 대한 간단한 이해

네트워크의 연결 도구

운영체제에 의해 제공이 되는 소프트웨어적인 장치


소켓의 비유와 분류

TCP 소켓은 전화기에 비유될 수 있음

소켓은 socket 함수의 호출을 통해서 생성됨

단 전화를 거는 용도의 소켓과 전화를 수신하는 용도의 소켓 생성 방법에는 차이가 있다.

1
2
3
4
#include<sys/socket.h>
 
int socket(int domain, int type, int protocol);
 
cs

소켓의 생성

=> 성공시 파일 디스크립터, 실패 시 -1 반환


소켓의 주소 할당 및 연결

전화기에 전화번호가 부여되듯이 소켓에도 주소정보가 할당

소켓의 주소정보는 IP와 PORT번호로 구성됨

1
2
3
#include<sys/socket.h>
int bind(int sockfd, struct sockaddr *myaddr, socklen_t addrlen);
 
cs

주소의 할당

=> 성공시 0, 실패 시 -1 반환


연결요청이 가능한 상태의 소켓

연결요청이 가능한 상태의 소켓은 걸려온느 전화를 받을 수 있는 상태에 비유할 수 있다.

전화를 거는 용도의 소켓은 연결요청이 가능한 상태의 소켓이 될 필요가 없다. 이는 걸려오는 전화를 받는 용도의 소켓에서 필요한 상태이다.

1
2
3
#include<sys/socket.h>
int listen(int sockfd, int backlog);
 
cs

연결요청 가능한 상태로 변경

=> 성공시 0, 실패시 -1 반환

소켓에 할당된 IP와 Port번호로 연결요청이 가능한 상태가 됨


연결요청의 수락

걸려오는 전화에 대해서 수락의 의미로 수화기를 드는 것에 비유 할수 있다.

연결요청이 수락되어야 데이터의 송수신이 가능

수락된 이후에 데이터 송수신이 양방향성으로 됨

1
2
3
#include<sys/socket.h>
int accept(int sockfd, int backlog);
 
cs


연결을 요청하는 소켓의 구현

리스닝 소켓과 달리 구현의 과정이 매우 간단

'소켓의 생성'과 연결의 요청'으로 구분


소켓을 사용하기 위한 연결

Server

Client

소켓 생성(socket)

IP/PORT (bind)

요청대기(listen)

수락(accept)

Read/Write

종료(close)

소켓 생성(Socket)

연결 요청(Connect)

Read/Write

종료(close)


소켓의 종류

 TCP

 UDP

동기식 연결 방식

데이터가 손실되지 않음

데이터가 순서대로 전달됨

비동기식 연결방식

데이터 손실 발생할 수 있음

속도가 빠름(상대적) 


간단한 예제 (C언어)

서버 : 포트를 열고 대기한 상태에서 클라이언트가 접속하면 Hello World를 전송

클라이언트 : 서버의 IP와 PORT번호를 입력하여 서버에 접근하자마자 Read하고 받은 데이터를 출력

서버와 클라이언트 프로젝트를 각각 만들어야함


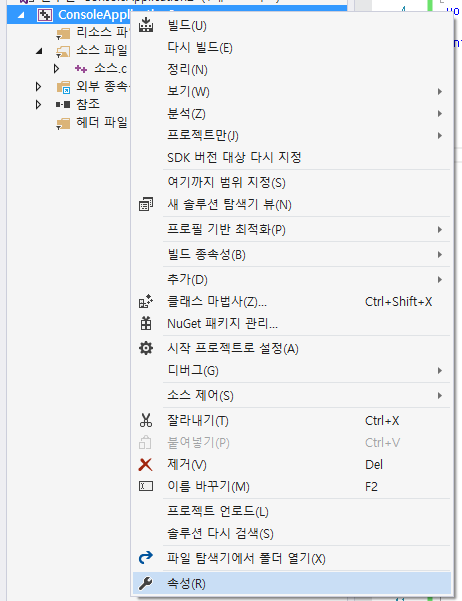
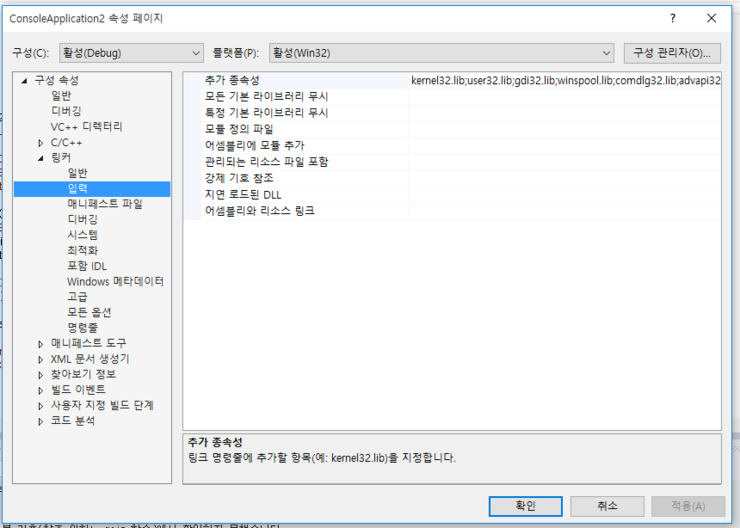
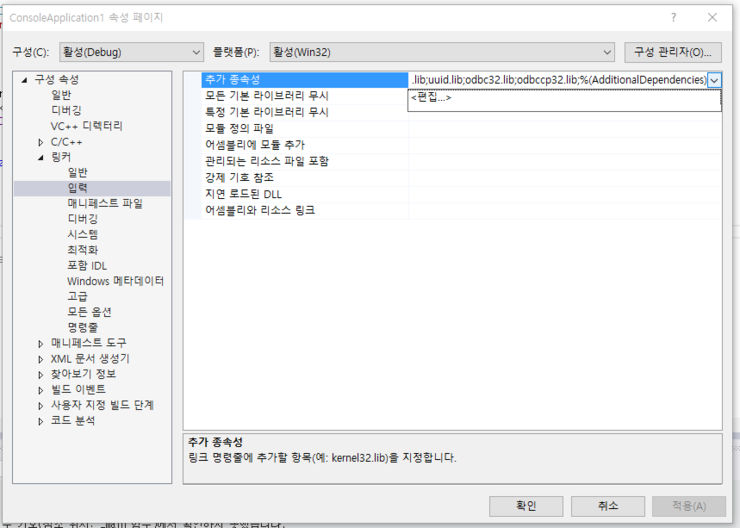
프로젝트에 라이브러리 추가

프로젝트 오른쪽 클릭 -> 속성

링커 -> 입력으로 이동

추가 종속성 -> 편집 누르기


ws2_32.lib 를 적기


Hello_Client_win.c (클라이언트 소스)

1
2
3
4
5
6
7
8
9
10
11
12
13
14
15
16
17
18
19
20
21
22
23
24
25
26
27
28
29
30
31
32
33
34
35
36
37
38
39
40
41
42
43
44
45
46
47
48
49
50
51
#include <stdio.h>
#include <stdlib.h>
#include <winsock2.h>
void ErrorHandling(char* message);
 
int main(int argc, char* argv[])
{
    WSADATA wsaData;
    SOCKET hSocket;
    SOCKADDR_IN servAddr;
 
    char message[30];
    int strLen;
 
    if(argc!=3)
    {
        printf("Usage : %s <IP> <port>\n", argv[0]);
        exit(1);
    }
 
    if(WSAStartup(MAKEWORD(22), &wsaData) != 0)
        ErrorHandling("WSAStartup() error!");  
    
    hSocket=socket(PF_INET, SOCK_STREAM, 0);
    if(hSocket==INVALID_SOCKET)
        ErrorHandling("hSocketet() error");
    
    memset(&servAddr, 0sizeof(servAddr));
    servAddr.sin_family=AF_INET;
    servAddr.sin_addr.s_addr=inet_addr(argv[1]);
    servAddr.sin_port=htons(atoi(argv[2]));
    
    if(connect(hSocket, (SOCKADDR*)&servAddr, sizeof(servAddr))==SOCKET_ERROR)
        ErrorHandling("connect() error!");
 
    strLen=recv(hSocket, message, sizeof(message)-10);
    if(strLen==-1)
        ErrorHandling("read() error!");
    printf("Message from server: %s \n", message);  
 
    closesocket(hSocket);
    WSACleanup();
    return 0;
}
 
void ErrorHandling(char* message)
{
    fputs(message, stderr);
    fputc('\n', stderr);
    exit(1);
}
cs


Hello_server_win.c (서버 소스)

1
2
3
4
5
6
7
8
9
10
11
12
13
14
15
16
17
18
19
20
21
22
23
24
25
26
27
28
29
30
31
32
33
34
35
36
37
38
39
40
41
42
43
44
45
46
47
48
49
50
51
52
53
54
55
56
57
#include <stdio.h>
#include <stdlib.h>
#include <winsock2.h>
void ErrorHandling(char* message);
 
int main(int argc, char* argv[])
{
    WSADATA    wsaData;
    SOCKET hServSock, hClntSock;        
    SOCKADDR_IN servAddr, clntAddr;        
 
    int szClntAddr;
    char message[]="Hello World!";
 
    if(argc!=2
    {
        printf("Usage : %s <port>\n", argv[0]);
        exit(1);
    }
  
    if(WSAStartup(MAKEWORD(22), &wsaData)!=0)
        ErrorHandling("WSAStartup() error!"); 
    
    hServSock=socket(PF_INET, SOCK_STREAM, 0);
    if(hServSock==INVALID_SOCKET)
        ErrorHandling("socket() error");
  
    memset(&servAddr, 0sizeof(servAddr));
    servAddr.sin_family=AF_INET;
    servAddr.sin_addr.s_addr=htonl(INADDR_ANY);
    servAddr.sin_port=htons(atoi(argv[1]));
    
    if(bind(hServSock, (SOCKADDR*) &servAddr, sizeof(servAddr))==SOCKET_ERROR)
        ErrorHandling("bind() error");  
    
    if(listen(hServSock, 5)==SOCKET_ERROR)
        ErrorHandling("listen() error");
 
    szClntAddr=sizeof(clntAddr);        
    hClntSock=accept(hServSock, (SOCKADDR*)&clntAddr,&szClntAddr);
    if(hClntSock==INVALID_SOCKET)
        ErrorHandling("accept() error");  
    
    send(hClntSock, message, sizeof(message), 0);
    closesocket(hClntSock);
    closesocket(hServSock);
    WSACleanup();
    return 0;
}
 
void ErrorHandling(char* message)
{
    fputs(message, stderr);
    fputc('\n', stderr);
    exit(1);
}
 
cs


서버,클라이언트 둘다 실행시 main 에 매개변수를 줘야 실행이 됨


Cmd를 이용한 main문에 매개변수 전달 (프로젝트 빌드 후)

서버

실행 파일 + 포트번호 매개변수 입력


클라이언트 (출력결과)

IP번호 (현재는 같은 컴퓨터에서 실행해서 로컬호스트인 127.0.0.1 입력)와 서버에서 연 PORT번호 입력


스트림(stream) : 입력과 출력을 바이트(byte)들의 흐름으로 생각하는 것

스트림에는 기본적으로 버퍼가 포함되어 있다.

 이름

스트림

연결 장치

stdin

표준 입력 스트림

키보드

stdout

표준 출력 스트림

모니터의 화면

stderr

표준 오류 스트림

모니터의 화면


사용하는 스트림에 따른 분류


  • 표준 입출력 스트림을 사용하여 입출력을 하는 함수
  • 스트림을 구체적으로 명시해 주어야 하는 입출력 함수

데이터의 형식에 따른 분류


  • getchar()나 putchar()처럼 문자형태의 데이터를 받아들이는 입출력
  • printf()나 scanf()처럼 구체적인 형식을 지정할 수 있는 입출력


 스트림 형식

표준 스트림 

일반 스트림 

설명 

 형식이 없는 입출력(문자 형태)

 getchar()

 fgetc(FILE *f,...)

 문자 입력 함수

 putchar()

 fputc(FILE *f,...)

 문자 출력 함수

 gets()

 fgetcs(FILE *f,...)

 문자열 입력 함수

 puts()

 fputs(FILE *f,...)

 문자열 출력 함수

 형식이 있는 입출력(정수, 실수,..)

 printf()

 fprintf(FILE *f,...)

 형식화된 출력 함수

 scanf()

 fscanf(FILE *f,...)

 형식화된 입력 함수


스트림은 구체적으로 FILE 구조체를 통하여 구현

FILE은 stdio.h에 정의되어 있다.


파일의 개념


C에서의 파일은 일련의 연속된 바이트

모든 파일 데이터들은 결국은 바이트로 바뀌어서 파일에 저장


텍스트 파일 : 사람이 읽을 수 있는 텍스트가 들어 있는 파일

아스키 코드를 이용하여 저장, 연속적인 라인들로 구성


이진 파일 : 사람이 읽을 수는 없으나 컴퓨터는 읽을 수 있는 파일. 이진 데이터가 직접 저장되어 있는 파일. 

텍스트 파일과는 달리 라인들로 분리되지 않음. 모든 데이터들은 문자열로 변환되지 않고 입출력


파일 처리 순서

파일 열기 -> 파일 읽기 및 쓰기 -> 파일 닫기

디스크 파일은 FILE 구조체를 이용하여 접근

파일 포인터 : FILE 구조체를 가리키는 포인터


파일 열기

FILE *fopen(const char *name, const char *mode)

name : 파일의 이름(경로 포함) 

mode : 파일을 여는 모드 ("r" : 읽기, "w" : 쓰기, "a" : 이어 쓰기, 

         "b" : 이진 파일 모드로 열기 -> rb : 읽기 모드+이진, wb : 쓰기 모드 + 이진 파일 모드)


<!--[endif]-->

파일 닫기

int fclose(FILE *stream);

파일 지우기

int remove(const char *path);


파일 입출력 라이브러리 함수


종류

설명

입력 함수

출력 함수

문자 단위

문자 단위로 입출력

int fgetc(FILE *fp)

int fputc(int c, FILE *fp)

문자열 단위

문자열 단위로 입출력

char *fgets(FILE *fp)

int fputs(const char *s, FILE *fp)

서식화된 입출력

형식 지정 입출력

int fscanf(FILE *fp, ...)

int fprintf(FILE *fp,...)

이진 데이터

이진 데이터 입출력

fread()

fwrite()


버퍼링

fopen()을 사용하여 파일을 열면, 버퍼가 자동으로 만들어진다.

버퍼는 파일로부터 읽고 쓰는 데이터의 임시 저장 장소로 이용되는 메모리의 블록

디스크 드라이브는 블록 단위 장치이기 때문에 블록 단위로 입출력을 해야만 가장 효율적으로 동작

1024바이트의 블록이 일반적

파일과 연결된 버퍼는 파일과 물리적인 디스크 사이의 인터페이스로 사용


fflush(fp) : 버퍼의 내용이 디스크 파일에 써진다.

setbuf(fp,NULL) : 스트림의 버퍼를 직접 지정하는 함수로서 만약 버퍼자리에 NULL을 써주면 버퍼를 제거하겠다는 것을 의미


순차 접근 방법 : 데이터를 파일의 처음부터 순차적으로 읽거나 기록하는 방법

임의 접근 방법 : 파일의 어느 위치에서든지 읽기와 쓰기가 가능한 방법


임의 접근 파일의 원리

파일 위치 표시자 : 읽기와 쓰기 동작이 현재 어떤 위치에서 이루어지는 지를 나타낸다.

강제적으로 파일 위치 표시자를 이동시키면 임의 접근이 가능

int fseek(FILE *fp, long offset, int origin);

fp : 열린 파일을 저장한 변수

offset : 임의 접근할 곳 (단위 L 100L이면 100바이트 이동한다)

origin : SEEK_SET = 파일의 시작 SEEK_CUR = 현재 위치 SEEK_END = 파일의 끝


void rewind(FILE *fp) : 파일 위치 표시자를 0으로 초기화


long ftell(FILE*fp) : 파일 위치 표시자의 현재 위치를 반환


수식(A*B-C/D)에 대한 이진 트리를 연결 자료구조를 사용하여 표현하고 전위,중위, 후위 순회에 따른 경로를 출력한다.


1
2
3
4
5
6
7
8
9
10
11
12
13
14
15
16
17
18
19
20
21
22
23
24
25
26
27
28
29
30
31
32
33
34
35
36
37
38
39
40
41
42
43
44
45
46
47
48
49
50
51
52
53
54
55
56
57
58
59
60
61
62
#include <stdio.h>
#include<stdlib.h>
#include<memory.h>
 
typedef struct treeNode {
    char data;
    struct treeNode *left;
    struct treeNode *right;
} treeNode;
 
treeNode* makeRootNode(char data, treeNode* leftNode, treeNode* rightNode) {
    treeNode* root = (treeNode *)malloc(sizeof(treeNode));
    root->data = data;
    root->left = leftNode;
    root->right = rightNode;
    return root;
}
 
void preorder(treeNode* root) {
    if (root) {
        printf("%c", root->data);
        preorder(root->left);
        preorder(root->right);
    }
}
 
void inorder(treeNode* root) {
    if (root) {
        inorder(root->left);
        printf("%c", root->data);
        inorder(root->right);
    }
}
 
void postorder(treeNode* root) {
    if (root) {
        postorder(root->left);
        postorder(root->right);
        printf("%c", root->data);
    }
}
 
void main() {
    treeNode* n7 = makeRootNode('D'NULLNULL);
    treeNode* n6 = makeRootNode('C'NULLNULL);
    treeNode* n5 = makeRootNode('B'NULLNULL);
    treeNode* n4 = makeRootNode('A'NULLNULL);
    treeNode* n3 = makeRootNode('/', n6, n7);
    treeNode* n2 = makeRootNode('*', n4, n5);
    treeNode* n1 = makeRootNode('-', n2, n3);
 
    printf("\n preorder : ");
    preorder(n1);
 
    printf("\n inorder : ");
    inorder(n1);
 
    printf("\n postorder : ");
    postorder(n1);
 
    getchar();
}
cs


출력결과


(C언어) 순차 자료구조를 이용한 최대 히프 프로그램


1
2
3
4
5
6
7
8
9
10
11
12
13
14
15
16
17
18
19
20
21
22
23
24
25
26
27
28
29
30
31
32
33
34
35
36
37
38
39
40
41
42
43
44
45
46
47
48
49
50
51
52
53
54
55
56
57
58
59
60
61
62
63
64
65
66
67
68
69
70
71
72
73
74
75
76
77
78
79
80
#include <stdio.h>
#include <stdlib.h>
#define MAX_ELEMENT 100
typedef struct {    //히프에 대한 1차원 배열과 히프 원소의 갯수를 구조체로 묶어서 선언
    int heap[MAX_ELEMENT];
    int heap_size;
} heapType;
 
heapType* createHeap()        //공백 히프를 생성하는 연산
{
    heapType *= (heapType *)malloc(sizeof(heapType));
    h->heap_size = 0;
    return h;
}
 
void insertHeap(heapType *h, int item)    //히프에 item을 삽입하는 연산
{
    int i;
    h->heap_size = h->heap_size + 1;
    i = h->heap_size;
    while ((i != 1) && (item > h->heap[i / 2])) {
        h->heap[i] = h->heap[i / 2];
        i /= 2;
    }
    h->heap[i] = item;
}
 
int deleteHeap(heapType *h)        //히프의 루트를 삭제하여 반환하는 연산
{
    int parent, child;
    int item, temp;
    item = h->heap[1];
    temp = h->heap[h->heap_size];
    h->heap_size = h->heap_size - 1;
    parent = 1;
    child = 2;
    while (child <= h->heap_size) {
        if ((child <= h->heap_size) && (h->heap[child] < h->heap[child + 1]))
            child++;
        if (temp >= h->heap[child])    break;
        else {
            h->heap[parent] = h->heap[child];
            parent = child;
            child = child * 2;
        }
    }
    h->heap[parent] = temp;
    return item;
}
 
printHeap(heapType *h)    //1차원 배열 히프의 내용을 출력하는 연산
{
    int i;
    printf("Heap : ");
    for (i = 1; i <= h->heap_size; i++)
        printf("[%d]", h->heap[i]);
}
 
void main()
{
    int i, n, item;
    heapType *heap = createHeap();
    insertHeap(heap, 10);
    insertHeap(heap, 45);
    insertHeap(heap, 19);
    insertHeap(heap, 11);
    insertHeap(heap, 96);
 
    printHeap(heap);
 
    n = heap->heap_size;
    for (i = 1; i <= n; i++) {
        item = deleteHeap(heap);
        printf("\ndelete : [%d] ", item);
    }
 
    getchar();
}
 
 
cs


출력 결과


+ Recent posts